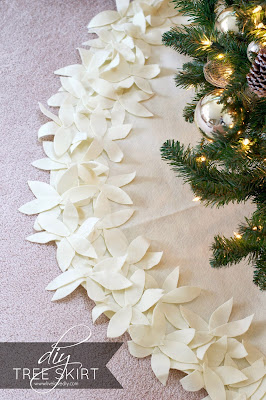
You KNOW how I feel about sewing.
I really wanted an ivory tree skirt this year, and being totally unwilling to spend my entire Christmas budget on a skirt for my tree, I bought a yard of ivory felt for $10 instead.
A couple hours later, I was covered in fuzz and hot glue, but this little fella had been created.
So, here's how I made it.
Please pardon my nighttime photos. I sometimes forget that I should take nice photos and pretend like I live inside a magazine. Actually, I forget that all the time. Who are we kidding?
The jig is up, Virginia.
Okay! Moving on! So, first things first, take a giant piece of felt and fold it in two. Then cut it into a half circle and cut a smaller circle out of the middle. This is where the tree base goes. You'll also cut along the seam on one half so that you can get it around your tree.
This is what it should look like when you unfold it. You can see the cut seam up at the top.
You can hem that seam if you want, or add a button closure, but I just left it unfinished because my tree is up against the wall and no one will ever see the back of it.
Next, cut petals. So many petals. I just cut one petal that I liked and then used it as a pattern to cut the rest. I think I probably cut 100+. This was the most tedious part and my poor little fingers paid the price. Still, totally worth it.
Also, if you invest in scissors that cost more than $3, you probably won't suffer like I did. :)
Then, using hot glue, arrange the petals to make a flower. I used 6 petals to make each flower. I laid down the first four and then arranged two on the top.
Once you have all your flowers made, start hot gluing them around the edge of the skirt. I glued on one whole row and then did a second row, layering them slightly underneath the first row.
I think the trick is definitely to layer them slightly so that they bunch up a little bit. You can tell in the below picture that there are two rows of flowers. You can do as many rows as you want, or even fill up the whole skirt.
I just totally hit my limit after two rows.
Blistered fingers = AND I think it's done!!
I absolutely love the way it turned out though, especially for just being a piece of felt and some hotglue. I can definitely see myself using this next year. And the next year.
To infinity and beyond.
And that's all for today, ya'll!
Thanks so much for stopping by! If you missed any of my other holiday projects so far, you can catch up here or check out my favorite thing ever here.


-->


About what size felt did you use and did you need more besides what was left from cutting the circle to make the flowers? Love the way it looks.
ReplyDeleteLove this! I feel like finding a cute tree skirt at a good price is like mission impossible!
ReplyDeleteI love this!!! I might try to make something like it as a tablecloth for my round table. Super inspiration.
ReplyDeleteLooks awesome! It was the thing I was admiring most in your tree post! HA, I rhyme. Genius.
ReplyDeleteIt's purty. I like it. I might try that next year if I get totally sick of burlap. That's the kick I'm on right now - burlap.
ReplyDeleteGreat Idea Virginia! Looks a little time consuming but so worth it! Simple and Beautiful!
ReplyDeleteCindy@GlassSlipperRestorations.com
Absolutely beautiful! Have you thought of adding pearls or buttons in the center to coordinate with your button ornaments?
ReplyDeleteAfter reading all the comments you gave me the great idea of adding pearls...that's so beautiful sounding!
DeleteThis looks so elegant! I have a huge living room with brand new off white carpet (about like yours). I need to know how many yards of fabric you purchased so I can go get my fabric. I'll send you a picture when I'm done!
ReplyDeleteThank you!
You totally had me at NO-SEW and it is gorgeous!
ReplyDeleteTruly inspirational and with holiday company arriving soon this is going to be my solution . Thanks off sharing !
ReplyDeleteI have now refinished an antique dresser from a garage sale I bought for $10 bucks, made the ornament wreath, and I'm going out tomorrow after work to buy the felt to make this tree skirt! I'm so excited. Finding this blog was the courage I needed to tap into my creative side!
ReplyDeleteWhat a great tree skirt, I will be making one for our tree. Thanks
ReplyDeleteYou've done it again, Virginia. Made something beautiful and inspired me. I'm on day three of cut, glue, place, glue and I may run out of felt before this insane thing is finished but it will be worth it. I found a tutorial on how to cut a circle out of a square (you'd think it would have been intuitive but alas) and one for these very cool felt flowers. I'll send you a photo if it ever gets done. Thanks again for sharing your crafty, genius ways!
ReplyDelete