LiveLoveDIY home home my story house tour projects top 10 contact How To Make Gold Leaf Art faux stacked log fireplace tutorial DIY Abstract Wall Art diy ampersand thumbtack art 10 budget decorating tips LiveLoveDIY Image Map

March 22, 2013

DIY Flower Wreath

Today I'm sharing my little floral wreath I made using items from the dollar store. I absolutely love the way it turned out, and it's the perfect little wreath for spring.

How to make a floral wreath with dollar store supplies


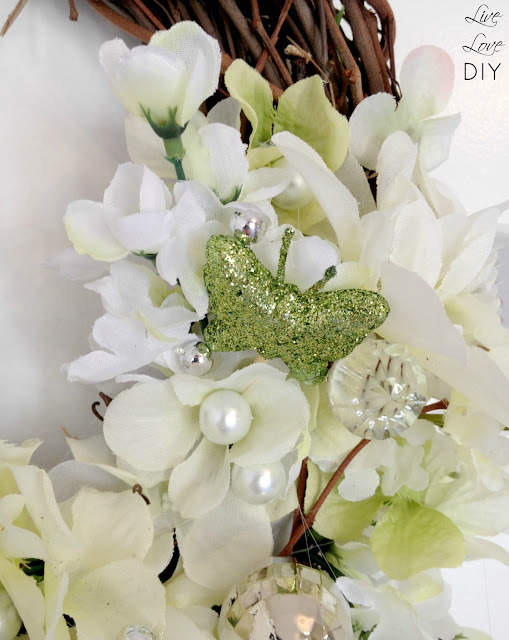
It's probably no surprise that my wreath is coated in pearls, glitter, giant crystals, disco balls, and butterflies.

How to make a floral wreath with dollar store supplies


I saw this amazing wreath from Horchow back in December when I was brainstorming ideas for Christmas wreaths (and ultimately ended up making this). I just couldn't stop thinking about it. 

 Horchow's White Floral Wreath (seen below) is absolutely gorgeous. I remember seeing it and thinking hmmmmm...I could make that.

How to make a floral wreath with dollar store supplies

And I did.
But my own sassy version.
Must. Have. Sass.


How to make a floral wreath with dollar store supplies


All of the supplies came from dollar stores and craft stores.
 It took a little time to make, but was super easy to do.

Here are the supplies I used to make my wreath.

How to make a floral wreath with dollar store supplies

1. Basic wood wreath ($3 at Joann's)
2. 4 stems of assorted fake flowers ($1 each at Dollar Tree = $4)
3. 1 strand of glass pearls ($1 at Joanns)
4. Green glitter butterflies ($1 at Dollar Tree)
5. Giant Crystals ($1 bag of 'table scatter' from Dollar Tree)
6. Glue sticks and glue gun (on hand = free!)
7. Mini disco balls from my Christmas ornament stash (free!)
8. Small silver beads leftover from Christmas garland strand (free!)
9. White ribbon (50 YARDS scored for $1 last year here)

TOTAL = $10


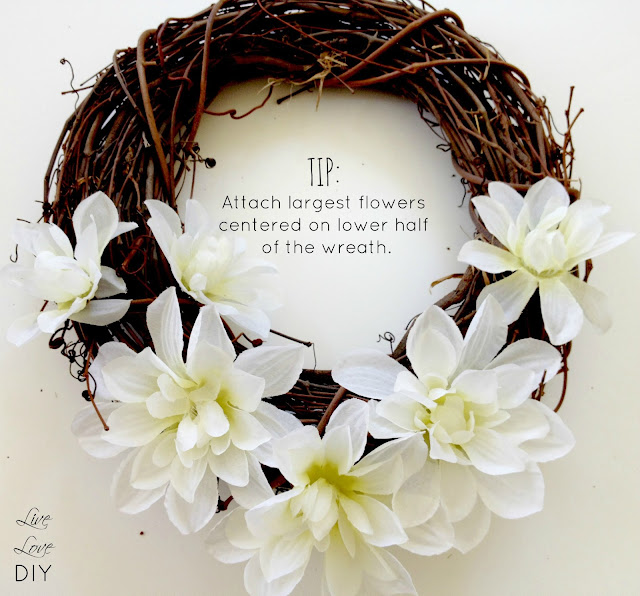
To make this wreath, start with a basic wreath form. Since the top will be exposed, I chose a simple wooden stick wreath. Using the largest flowers, center the flower heads among the lower half of the wreath.

How to make a floral wreath with dollar store supplies


Once your large flowers are in place, fill in the remaining bottom half of the wreath with the smaller flowers. Try using several different sizes and shapes of smaller flowers to give the wreath a little texture.


Now, it's time to add a little bling. I just randomly chose whatever I could find at the store/my house. I finally settled on pearls, giant crystals, mini-disco balls, small silver beads, and green-glittered-butterflies.

How to make a floral wreath with dollar store supplies


How to make a floral wreath with dollar store supplies


Once you've attached all of your bling with your hotglue, cut a long piece of ribbon and wrap it around the top of your wreath. 

How to make a floral wreath with dollar store supplies

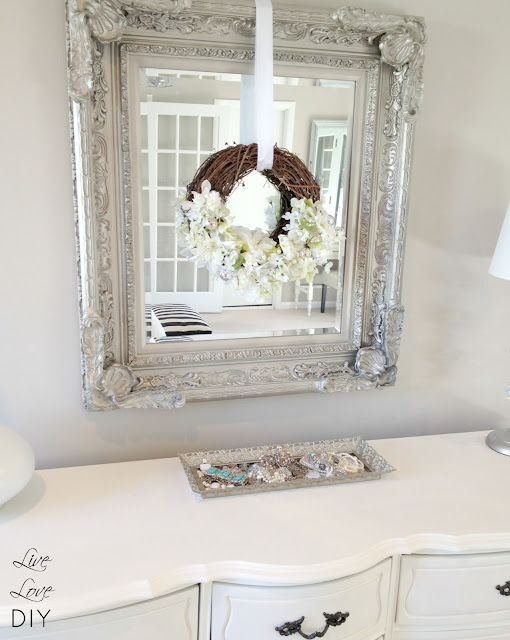
I attached the ribbon right to the wall with a single silver nailhead, right above my fantle
Jesse opens and closes the front door like a Woolly Mammoth and I don't have a mantle over the fireplace.
So, the fantle it is.


How to make a floral wreath with dollar store supplies


And that's all, folks! 

How to make a floral wreath with dollar store supplies


Thanks so much for stopping by! 


Follow my blog with
bloglovin' photo BlogLovin_zps5407d9e3.jpg
Follow my blog onFacebook or

or

Subscribe to LiveLoveDIY with email!
Enter your email address:


click map Facebook Pinterest Google+ Twitter Mail Subscribe

-->

March 20, 2013

Creating a Photo Wall Display: Tips & Tricks You Should Know


As you probably know, I love art. One of my favorite ways to display art in our house is with a gallery wall. Today I'll be sharing some fun ideas for your next gallery wall.

12 Unique Ways To Create a Photo Wall Display | LiveLoveDIY


You can use any of the above ideas to create a really unique wall of art in any room.
Here are some more fun tips that I use when assembling my own gallery walls.

How To Create a Photo Gallery Wall: Tips & Tricks You Should Know


#1. Mix & Match. 
 In my Office Gallery Wall I mixed a sailboat print, weird-foreign-maps, small mirrors, and some of my favorite photographs that I had printed in black and white. The majority of this wall was sourced straight from thrift stores. It doesn't need to be expensive to look great.


12 Unique Ways To Create a Photo Wall Display | LiveLoveDIY


#2. Have fun mixing different sizes and shapes.
 If you want to mix and match, go for it. Pick 2-3 sizes/shapes and repeat them throughout the gallery wall. This makes it more pleasing to the eye. Or you can just use all totally unique items. I'm actually loving that idea more and more as time goes on, and am already thinking about my next gallery wall.

12 Unique Ways To Create a Photo Wall Display | LiveLoveDIY


#3. Draw a line.
 Here is a drawing I made of the office gallery wall to help you see what I'm referring to. See the line? Decide on a 'line' for your gallery wall. It can be vertical or horizontal, and you can place it anywhere. You can also use multiple lines, kind of like a grid. Use the line/lines to anchor your frames. You can see more about this here.

12 Unique Ways To Create a Photo Wall Display | LiveLoveDIY


#3. Make it symmetrical 
Create a gallery wall using a series of similar art, slightly varied. I created a gallery wall like this in my living room using botanical prints (found on eBay) and dollar store frames (spray-painted gold).  You can see more pics of this gallery wall here


12 Unique Ways To Create a Photo Wall Display | LiveLoveDIY


#4. Keep it simple.

  I kept it pretty simple when I created the Bird Art gallery wall in our guest bathroom. I printed out black silhouette birds on our printer and framed it in simple white frames. 


12 Unique Ways To Create a Photo Wall Display | LiveLoveDIY


#5. Get reflective. Use mirrors.

If you're running low on art, no prob. Throw an interesting mirror (or two) in the mix! I did this with our Mirror Gallery Wall in our guest bedroom.


12 Unique Ways To Create a Photo Wall Display | LiveLoveDIY


I hope I've left you with some great ideas for creating a gallery wall of your own! Thanks so much for stopping by!


For more tips on all things art, go here or here.


Follow my blog with
bloglovin' photo BlogLovin_zps5407d9e3.jpg
Follow my blog onFacebook or

or

Subscribe to LiveLoveDIY with email!
Enter your email address:


click map Facebook Pinterest Google+ Twitter Mail Subscribe

-->

March 14, 2013

How To Spray Paint a File Cabinet (and the occasional ceramic duck)

I've been in love with chalk paint for awhile now, ever since using it on the insides of my kitchen cabinets
This week, I discovered another great chalkboard paint idea.

Chalkboard Paint File Cabinet | LiveLoveDIY


I painted my file cabinet with it.


Chalkboard Paint File Cabinet | LiveLoveDIY

Well, sorta. 

But, before we talk about the makeover, you should probably know how I got it.

I was outside the other day checking our mail and I spied  something silver sitting on the end of our neighbor's driveway. Of course, being enamored with all things silver/free, I crept down the street to check it out, and I found this little fella with a free sign on it. 
It was straight from the Seventies and it weighed about 100 pounds, so naturally I tried to lug it down the street by myself. 
I wiggled it about four feet and and it got stuck.
In the middle of the street, people.

So, I left it in the middle of the street and ran back home and made a sign that said 'The neighbor is taking this. SOLD.' or something to that effect. And then I nervously peeped out my window for the next 3 hours until Jesse came home and could help me move it. 
It was still in the street when he got home.


And that, friends, is just a totally normal story about how to procure a filing cabinet.
Am I right or am I right?


Anyways, here's what the file cabinet looked like when I first wiggled it home. It was really beaten up and dirty. However, it was a total score because I've been needing a file cabinet for awhile. It was definitely made backintheday when they made things well. 
It's super sturdy and burly, like the Paul Bunyan of file cabinets. 
Meet Paul.

Chalkboard Paint File Cabinet | LiveLoveDIY


So, I cleaned it off really well and then I removed the drawers. Then, I used two light coats of this (affiliate link) high quality black spray paint. I learned not to skimp on the spray paint quality after my last disaster.

Chalkboard Paint File Cabinet | LiveLoveDIY

While I was letting that dry, I painted the drawers with black chalkboard paint. 

This is what the drawers looked like after just one coat. I ended up doing two coats. In my experience, chalk paint adheres really well, so I didn't bother priming. You may want to...it's up to you. I also covered the hardware with some masking tape and used my silver leaf Rub n Buff (affiliate link) to make all the hardware look new and pretty.

Chalkboard Paint File Cabinet | LiveLoveDIY

When everything was finished and dry, I put it all back together and labeled the drawers with my favorite Bistro chalk pen (affiliate link). It writes like a pen, but looks like chalk, and it's awesome. 


Chalkboard Paint File Cabinet | LiveLoveDIY


I accessorized Paul with a cute silver tray and some fresh flowers.
Just what every Paul needs.

Chalkboard Paint File Cabinet | LiveLoveDIY


Chalkboard Paint File Cabinet | LiveLoveDIY

All in all, I'm loving Paul and finding him to be quite useful.


He fits right in with all of my other black painted thrifty furniture.


Oh, and Paul wasn't the only recent addition to the office.
I also found a wooden organizer at the thrift store that I spray painted white, and use for all my envelopes and paper.


I also found the coolest little duck ever. He's proven himself to be a really great pen/scissors holder.
Look out, Paul.


 If you come across fun ceramics at a thrift store, you can paint them with a high gloss white spray paint and they'll look just like the brand new ceramics you see all over the place right now!
Here is the duck before.


And the duck after.


I also spruced up the bookshelf with some fabric bins. 
Just to keep things organized. 
That bookshelf turns into a hoarder zone fast.


I also found a random red stapler at the thrift store.


And those are all of the updates for today! 
Paul says bye.

Chalkboard Paint File Cabinet | LiveLoveDIY

'Til next time!


Follow my blog with
bloglovin' photo BlogLovin_zps5407d9e3.jpg
Follow my blog onFacebook or

or

Subscribe to LiveLoveDIY with email!
Enter your email address:


click map Facebook Pinterest Google+ Twitter Mail Subscribe


-->

Quick and Easy LiveLoveDIY Projects

Mod Podge Hangers Photo Wall Ideas Sequin Art Chalkboard Cabinets Gold Leaf Art Stacked Log Tutorial