LiveLoveDIY home home my story house tour projects top 10 contact How To Make Gold Leaf Art faux stacked log fireplace tutorial DIY Abstract Wall Art diy ampersand thumbtack art 10 budget decorating tips LiveLoveDIY Image Map

January 25, 2013

How To Make DIY Sequin Art

I'm so excited to show ya'll my latest little creation...my DIY sequin art I made out of an old piece of thrift store art.


How to make DIY herringbone sequin art out of old thrift store art! Check out the before pics!


Here's what it looked like when I first brought it home. Like a little magenta time capsule straight from 1991.


Luckily, it was only a few bucks, and it was a custom framed print with a nice shape and good size mat. I knew it would be perfect for what I had in mind.


It was super easy to make, too. All you need is a silver spray paint, white spray paint, a frame, a mat, some paper, hot glue, and some sequins.

First, take apart your frame, and disassemble all of the pieces.


Next, spray paint the frame silver, spray paint the mat white, and then use the backside of the old art for your new art. I chose to use Rust-Oleum Flat White for the mat so that it wouldn't stick to the glass. I've had problems with that before, and have found that flat white spray paint works great for this.


Spray painting outdated art mats is such a great way to save money, and I do it all the time now!


Now for the art. I found it helpful to draw a little guide on the backside of artwork. The original print was actually glued to a foamboard, so it was the perfect surface for my new art.

You can really design any shape or pattern you want. I chose to make a herringbone pattern. I sketched out my design with a pen, using a ruler to help. No one will ever see your lines, so don't worry about messing up.


Next, I gathered my supplies: sequins, paper, ribbon, and hotglue.


Hotglue your sequins on first. Start from the bottom row and then work your way up, overlapping from left to right, and overlapping each layer vertically.

Then, cut stripes of paper (I used an exacto knife) to fit the next row. Glue those on as well. This will cover up parts of your last row of sequins and make a nice clean line.


I chose to trim everything with silver ribbon, too. It gave it a nice finished look.


Then, put the mat back on, insert your new art back into the frame, and voila! Some chic new art for pennies on the dollar!


I absolutely love the way it turned out!


That's all for today!

Thanks so much for stopping by! Don't forget to pin this post so you can find it next time you need it!


Follow my blog with
bloglovin' photo BlogLovin_zps5407d9e3.jpg
Follow my blog onFacebook or

or

Subscribe to LiveLoveDIY with email!
Enter your email address:


click map Facebook Pinterest Google+ Twitter Mail Subscribe

-->

January 15, 2013

Bathroom Ideas: How To Right A Wrong


Here's the deal. I did tons of hard work on this bathroom many-moons ago. I took it from 1980's to 2010-ish by painting about every surface in sight. It looked so much better; many of you thought it looked great. BUT, since I live with this bathroom every single day, a few things started to bother me. And since this is a blog about the mundane happenings of my house, here's THAT story.

Last week I stopped by the thrift store. (If you've followed me for awhile, you know by now that I go to the thrift store about as much as I brush my teeth. And I have some rather pearly-whites.)

I came home with 3 amazing scores. I found this amazing chandelier that I rehabbed, and then I found 2 very awesome things that set me off on a bathroom-mini-makeover.

 So, my absolute favorite find was this antique hand mirror. My grandmother gave me one almost exactly like it several years ago. It resides on my dresser, and I adore it.  So, when I saw this one at the thrift store for $11, I yanked it up in warp-speed.


There's so much total junk at thrift stores, but I always keep going back because there are treasures to be found, peoples!


The next thing I found I knew I wanted the minute I spotted it, but I had no idea what I would do with it. It was a silver framed mirror for $6. I thought it was really pretty, and for $6 you really can't miss. And then I picked it up and put it in my cart and saw a pottery barn pricetag on it. For $89. Now, I'm sure this thing was probably from 1998. But, still. You can surely imagine my brain celebration.

And when I brought it home and thought about it for a wee second, I knew. It would go where the 'crappy bath art' used to go.

Here is crappy bath art exhibit #1


And now here is the thrifty PB mirror ! 


It basically took my bathroom from 6-year-old-bath-time to normal zone.
Sometimes you just don't get it right on the first try.
You may also notice that I got some fancy new soft plush gray bath towels. I have a bad habit of using my towels as drop-cloths when I paint, and it was a necessary upgrade.

And since I grew to hate that awful youthy-loud-flowery shower curtain, I replaced it with a calm, cool, and collected adult version. Welcome Mr. gray, damask, pretty!


Sometimes it's amazing how little changes can affect how you feel about a room. Isn't the frame on the little mirror so dreamy? (For $6, you better be shaking your head in a yes-direction.)


And I love how a few fancy accents can totally take a vanity from plain-jane to luxurious!


In case you missed the first bathroom-redo post, that small canister and soap holder were also thrift store finds. The canister was real silver, too. Not that I care...I would sport a paper plate soap holder if the price was right, but hey, extra bonus points on a worthy thrift store find!

So, now, for those of you who missed the transformation of this bathroom on the first go-round, let's reminisce. Check out how gnarly this bathroom used to be before I got my paint-obsessed-little-hands on it!


It is yet another example of how you can update your house with just a bucket of paint and endless hours/patience on your hands! :)


And now, of course, it's latest updo without those awful letters! Again, if I was 6, my name was Jacob, and I liked to take a bath, the BATH would be appropriate. But, I'm 29, people call me Virginia, and there isn't even a bathtub in this bathroom, so let's keep it real. The toddler letters had to GO.


Oh, and one more teensy bit of reminiscing. If you're looking for a way to refresh your GROSS tile grout (I'm no stranger to disgusting grout), I found a pretty good solution, and I totally restored my tile grout. You can find all the gritty details here

Here's a little grout-restoring-proof for ya!


Not bad, eh?
So, now I'll leave you with a little peek out into my bedroom, which is what I see everytime I'm drying off my hiney....with one of my new luxurious non-paint-coated towels. :)


Thanks for listening to me ramble, and for caring about all of the ridiculously mundane details of my bathroom!

Pssssssst. Want more?
 Check out our house tour here!

The LiveLoveDIY House Tour: Shows how to completely transform a 1970's house! Amazing tips anyone can use!


or
check out some of our fave posts here!

Top 10 Thrift Store Tips: How To Create A Stylish Home On A Budget!


or here!


Subscribe to LiveLoveDIY via email
Enter your email address:

click map Facebook Pinterest Google+ Twitter Mail Subscribe

January 12, 2013

2013 FREE Printables!

Happy weekend! How is the new year treating you so far? I've been spending the day cleaning out our junk closets. So far I'm 4 giant trashbags in, and still can't see the floor. I'm kinda feeling like a hoarder today.
Meanwhile, I'm sharing a few printables I made today. I love to print out motivational sayings, frame them, and strategically place them around my office to keep me motivated. 
Plus, it's like free art. All you need is a printer and paper.

So, here's a couple of my printables to help keep ya' motivated this year. To print them, simply click on the link below each picture. It will take you to the hosted image and you can then print it. 


I hope you enjoy them! I really enjoyed making them! Hope you all have a wonderful weekend!


January 10, 2013

How To Update Old Brass Fixtures

Have you ever found something really cool at a thrift store and you bring it home and that one little thing ignites a spark that makes you change a bazillion other little things in your house?

Well, that happens to me on a weekly basis. For my own mental sanity, I should really just stay out of thrift stores, but dangit they draw me in like a gnat to a porch light.
This past weekend, I came across a brassy little lantern chandelier at the thrift store. I had been looking for something like this for awhile, so when I saw a $5 price tag on the lantern, I think I yelped outloud. Seriously, this thing should have been more than $5.
High-five to the awesome person who donated this to the thrift store.

The secret to updating old brass fixtures! Such an easy update! Check this out!


When I saw this thing, I knew immediately where it would go. 

The secret to updating old brass fixtures! Such an easy update! Check this out!

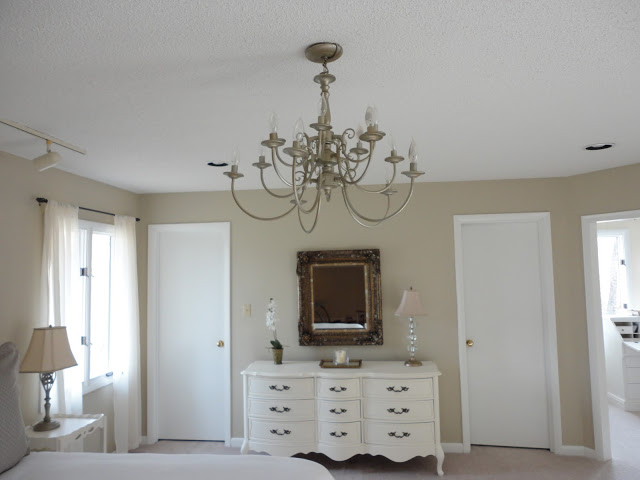
The above picture is from the first set of renovations I did to our master bedroom. I found that giant chandelier (also originally brass) and decided that it was better than the dark brown ceiling fan that was there before. 
You have to go see the before pic of this room with the dark wood paneling and old ceiling fan. 

After a while of living with the giant chandelier, it began to really annoy me. It was just too large.

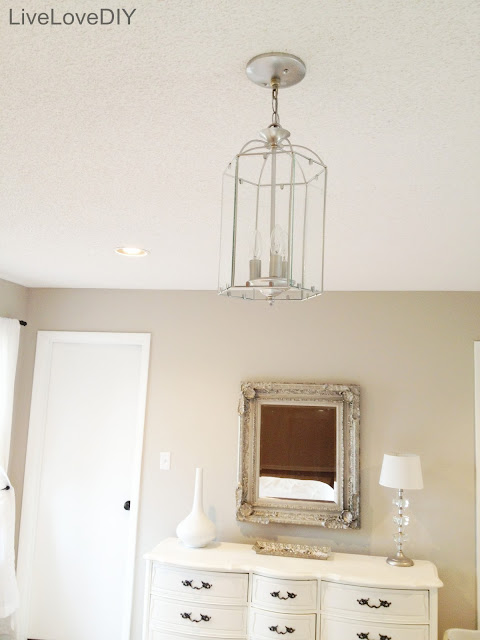
The little brass lantern seemed like a much better fit.

So, I decided to spray paint the little brass lantern, too.
Here's what I ended up with. 

The secret to updating old brass fixtures! Such an easy update! Check this out!

I really love the way it turned out, and the size fits the room much better.

The secret to updating old brass fixtures! Such an easy update! Check this out!


To update the chandelier from brass to brushed silver,  I used one of my favorite silver spray paints, Rustoleum Titanium Silver (amazon affiliate link). This is the same paint that I used all over my kitchen and on my bathroom faucet. I like it because it creates a brushed nickel finish rather than a chrome silver finish. So, it's perfect for all sorts of home decor stuff, especially fixtures.


Rustoleum Titanium Silver Spray Paint - creates the most realistic 'brushed nickel' finish!


Once I had my chandelier hung, it got me on a redo-tons-of-other-stuff-binge. So, I completely redid my vanity area. If you read my blog a lot, you might notice what I did. 


 I spray painted the vanity mirror silver, too. And I also painted the table satin black, and completely reupholstered the chair.
See how this thing looked the day I brought it home from the thrift store here.


I love the way it looks in the evenings, with the little lamp on. Here's what it looks like during the day now.


I like the new vanity colors much better. They complement the green rug and embroidered pillows now. 


And that's not all. While I had my spray paint out, I spray painted another thrift store find. I found a little gold  mirrored vanity tray at the thrift store for $2. I thought it would be perfect to hold some of my jewelry. 


Most of this junk is from Target and thrift stores. And Forever 21...or Forever 29, as I like to call it.


And one last thing, I decided to sell my old vanity stool that sat under my antique flip-down desk. It was too small. So, I pulled an old piano bench out of a storage closet and painted it black. It's not a permanent solution, as I really have no idea what to do with this room long-term. But, it's okay for now.


Check out how I later upholstered this stool with stripes here.

And those are all of the bedroom updates for today!
Thanks so much for stopping by! 
*To see a complete history of the evolution of this room from the day we moved in to months after this post was written, go here.


Follow my blog with
bloglovin' photo BlogLovin_zps5407d9e3.jpg
Follow my blog onFacebook or

or

Subscribe to LiveLoveDIY with email!
Enter your email address:


click map Facebook Pinterest Google+ Twitter Mail Subscribe

-->

Quick and Easy LiveLoveDIY Projects

Mod Podge Hangers Photo Wall Ideas Sequin Art Chalkboard Cabinets Gold Leaf Art Stacked Log Tutorial