LiveLoveDIY home home my story house tour projects top 10 contact How To Make Gold Leaf Art faux stacked log fireplace tutorial DIY Abstract Wall Art diy ampersand thumbtack art 10 budget decorating tips LiveLoveDIY Image Map

April 28, 2012

Cheap Wall Art Ideas: Antler Silhouette Gallery Wall

I just went through 6 cans of spray paint. SIX.
 I decided I was done with antique gold accents and wanted more silver/champagne tones throughout our living room and entryway.

So I got some Krylon Champagne Mist and went crazy on three mirrors and twelve picture frames. And you thought I was kidding when I said I went crazy. While I was taking the gallery wall frames down to paint them, I decided to do something a little different and change out my vintage botanical prints to antler prints.
My husband could not be more pleased. Trading flowers for antlers is a big plus in the man-book-of-decor.
Surely that exists.

So, I found a few antler printables online, then printed and framed them.
Here is the final result of my new antler gallery wall!


I think it turned out pretty cool. And it's always nice to change things up a bit.
I also spray painted a few mirrors.
I did the one in the foyer that hangs on the rock wall.


I think it looks much better than the before. Don't you?


If you compare the photo above with the after photo, you can see that I also spray painted the mirror in the entryway 'nook', formerly known as the closet. (You can see more about that transformation here.) I also sprayed the vase a high gloss white (it used to be gold) and moved a little blue & silver striped rug onto the landing. I still need to update all of the light fixtures, but I've got a plan for that...later. 

(see more about the living room here)

I think the lighter metallic mirror enhances the stone wall much better than it did when it was dark gold.

Every thing just feels better now. 

As far as the antler wall goes, I got the idea after hanging the gallery wall of bird silhouettes I did in the striped guest bathroom.


If you want to print off your own deer and antler silhouettes, just google 'free deer silhouette' and 'free antler silhouette' and then just print, print, print, use up ink cartridge, use up ink cartridge, use up ink cartridge.

That's all there is to it. 
Oh, except for the fact that I had to take all of these bad boys down multiple times to spray paint the frames different colors.
I started off with white, and once they were all up, I hated it. Then chrome..which made it resemble a toolbox. Then finally settled on 'champagne'. Now I'm lovin' it.
Sigh. I hate not getting something right the first time, but I'm neurotic enough to keep at it 'til it's just right.


It's a subtle change, those antlers, but I think I like it better than the peacock feathers. They were too delicate for that big wall.
Oh, you delicate peacock, you!


So, what do you think? Do you like the antlers?


Follow my blog with
bloglovin' photo BlogLovin_zps5407d9e3.jpg
Follow my blog onFacebook or

or

Subscribe to LiveLoveDIY with email!
Enter your email address:


click map Facebook Pinterest Google+ Twitter Mail Subscribe

-->

April 26, 2012

How to Reupholster a Chair

Recently while thrift store shopping, I came across the cutest little chair for five dollars. After a little DIY upholstery work, it turned out even cuter.


How To Reupholster A Chair: an easy step-by-step tutorial anyone can do!


Here's how the chair looked when I first brought it home. It was a dark, scratched up wood and the seat cover was covered in a strawberry print.


How To Reupholster A Chair: an easy step-by-step tutorial anyone can do!

Pretty much awesome.


Strawberries or not, I thought it had the sweetest little shape and I loved the detail on the wooden frame.  I decided to paint the frame a light blue and recover the cushion. I used a $6 tablecloth for the seat cushion fabric. It was a heavy duty canvas cloth and was a much cheaper option than paying $40/yd for normal upholstery fabric. (See my tips on choosing a print here.)


Upholstery Tips & Tricks You Should Know!


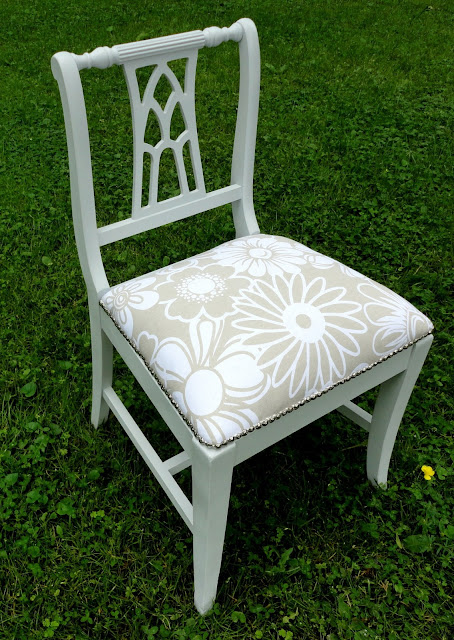
Here's how this cute little chair turned out.


How To Reupholster A Chair: an easy step-by-step tutorial anyone can do!


I trimmed the seat cushion with silver nailheads to add a little extra glam!


How To Reupholster A Chair: an easy step-by-step tutorial anyone can do!


Where do you think I should use this cute little chair? I'm thinking maybe the bedroom office/sitting room.


Now, let's go through reupholstering a seat cushion step by step. It's so easy and truly anyone can do it.

Here are the supplies you'll need.


How To Reupholster A Chair: an easy step-by-step tutorial anyone can do!


First,  flip the chair upside down and use a screwdriver to unscrew the seat cushion from the frame.


How To Reupholster A Chair: an easy step-by-step tutorial anyone can do!


Then haul the frame outside.


How To Reupholster A Chair: an easy step-by-step tutorial anyone can do!

Now it's time to paint.


How To Paint the Perfect Chair in 6 Steps | LiveLoveDIY


Here are my 6 easy steps to painting the perfect chair.

1. Lightly sand
 (use 150 grit sandpaper).
2. Use Spray Primer to coat the entire chair.
 (This will keep the wood stain from seeping through your paint, and will make the paint stick to the chair. I love using spray primer on chairs because it's so quick!)
3. Lightly sand when dry
 (use 150 or 220 grit sandpaper).
4. Paint 2 coats of your chosen paint
(sanding between coats).
5. When dry, do final light sanding to get the smoothest finish.
 (220 grit).
6. Coat with your choice of either wax or varnish. 
(I used Blair Spray Varnish because it's quicker than brush on and it's durable enough for a chair. See more about how to choose a clear coat here.)

For my paint color, I bought a sample of Behr Light French Gray. It's the perfect color of gray-blue and I've also used it here and here.


How To Reupholster A Chair: an easy step-by-step tutorial anyone can do!


Now that your chair frame is painted, it's time to reupholster the cushion.

First, lay your cushion upside down on the underside of the fabric. Cut around the cushion, leaving roughly 4'' or more on each side.


How To Reupholster A Chair: an easy step-by-step tutorial anyone can do!

I like to make my cushions super-plush, so I chose to pull the stuffing out of an old pillow and put it between the cushion and the fabric. Next, fold your fabric over each side, pulling as tight as possible, and staple around the edges. For an in depth step by step on making corners, please see this post.


How To Reupholster A Chair: an easy step-by-step tutorial anyone can do!

Do this all the way around the cushion.


After the cushion is upholstered, it's time to add the nail head trim.


How To Reupholster A Chair: an easy step-by-step tutorial anyone can do!

Simply hammer the nailheads in one by one in a straight line around the edge of the chair.


How To Reupholster A Chair: an easy step-by-step tutorial anyone can do!

And that's it! You have a brand new upholstered chair for a fraction of the cost! To see my top 10 favorite chairs I've redone, please visit this post.


Don't forget to pin this post so you'll have this info when you need it!


How To Reupholster A Chair: an easy step-by-step tutorial anyone can do!


Follow my blog with
bloglovin' photo BlogLovin_zps5407d9e3.jpg
Follow my blog onFacebook or

or

Subscribe to LiveLoveDIY with email!
Enter your email address:


click map Facebook Pinterest Google+ Twitter Mail Subscribe

-->

April 24, 2012

The Chalkboard Paint Kitchen Cabinet Makeover


I firmly believe in making the best of what you have.
What I have is a very small kitchen.

But after a few weeks of elbow grease, $25, and a pint of chalkboard paint,
I can finally say loud and proud:

I love you, little kitchen.

I've spent the past couple weeks painting the exteriors of our cabinets with a soft white paint and the insides of our cabinets with chalkboard paint. It's been so much work, and I'm so excited to finally be able to show you!


DIY Chalkboard Paint Kitchen Cabinets! Tons of great budget ideas to add character to a kitchen in this post!


First, let's start with the exteriors of the cabinets. Those got a nice new coat of fresh white paint.

DIY Chalkboard Paint Kitchen Cabinets! Tons of great budget ideas to add character to a kitchen in this post!

The interiors of each cabinet also got painted white, and then the backside of each cabinet door got painted with black chalkboard paint.


DIY Chalkboard Paint Kitchen Cabinets! Tons of great budget ideas to add character to a kitchen in this post!

The chalkboard detail added so much character to an otherwise average little kitchen.


DIY Chalkboard Paint Kitchen Cabinets! Tons of great budget ideas to add character to a kitchen in this post!

 
Just so you know what a huge improvement this is, take a look at what these awful 1970's cabinets looked like just a few weeks ago:


DIY Chalkboard Paint Kitchen Cabinets! Tons of great budget ideas to add character to a kitchen in this post!

These cabinets are over thirty years old, and were gross in just about every way possible. Since replacing them is totally not in our budget right now, I knew my only option was just to make the best of what we had. I realize that painting your kitchen cabinets isn't for everyone, but for an outdated kitchen like this, it made such a phenomenal improvement!


After painting the cabinets, I labeled each cabinet with whatever goodies were stored inside.

DIY Chalkboard Paint Kitchen Cabinets! Tons of great budget ideas to add character to a kitchen in this post!

This is my favorite cabinet, full of mugs I've collected through the years, mostly from thrift stores.


DIY Chalkboard Paint Kitchen Cabinets! Tons of great budget ideas to add character to a kitchen in this post!

I also made a special cabinet just for our party supplies. We entertain a lot, and it's nice to have everything in one place.


DIY Chalkboard Paint Kitchen Cabinets! Tons of great budget ideas to add character to a kitchen in this post!


I decided to spruce up my silverware drawer, too.


The DIY Kitchen: Affordable Kitchen Decorating Ideas Anyone Can Do!


I  painted and labeled my old wooden silverware organizer.


The DIY Kitchen: Affordable Kitchen Decorating Ideas Anyone Can Do!

and then I used the same blue paint on my old wooden knifeblock.


The DIY Kitchen: Affordable Kitchen Decorating Ideas Anyone Can Do!

and then I made a little area for all my spices, labeling each one and storing them in a crystal bowl I scored from the thrift store.

The DIY Kitchen: Affordable Kitchen Decorating Ideas Anyone Can Do!

I updated the kitchen light with a chandelier I found on Craigslist. It's much better than the former boob light.


DIY Chalkboard Paint Kitchen Cabinets! Tons of great budget ideas to add character to a kitchen in this post!

Some of the cabinets needed more TLC than the rest, like the pots & pans cabinet.


DIY Chalkboard Paint Kitchen Cabinets! Tons of great budget ideas to add character to a kitchen in this post!

I  got to enjoy contorting my body into a fruit rollup to reach the 4 feet of hidden space.


But the end result was totally worth fruit-rolluping myself.
Here is another one of my favorite parts of the kitchen.
I like the tile. I hate the color. Totally outdated, and not cohesive with my color scheme.
(ignore the dining room...under construction)


So, I painted it.


Like I do everything else. 


DIY Chalkboard Paint Kitchen Cabinets! Tons of great budget ideas to add character to a kitchen in this post!

I used paint and then put 2 layers of poly over it.

(Update. This totally did not last. Since this post, I've done something much better to this tile. Seriously. Check it out...it's awesome.)


 I also added a chalkboard trim around the bar. Those chairs are another Goodwill find. Originally $5 each and dark brown. I just primed and painted them a semi-gloss white.

DIY Chalkboard Paint Kitchen Cabinets! Tons of great budget ideas to add character to a kitchen in this post!

I also added a few botanical prints in white matted frames...one of my fave easy art ideas.

DIY Chalkboard Paint Kitchen Cabinets! Tons of great budget ideas to add character to a kitchen in this post!

And although this room still has a ways to go, it's so much better than it was when we moved in.


DIY Chalkboard Paint Kitchen Cabinets! Tons of great budget ideas to add character to a kitchen in this post!


DIY Chalkboard Paint Kitchen Cabinets! Tons of great budget ideas to add character to a kitchen in this post!


DIY Chalkboard Paint Kitchen Cabinets! Tons of great budget ideas to add character to a kitchen in this post!


It's really starting to feel like home!

Thanks so much for stopping by today!
Don't forget to pin this post so you'll have this info when you need it!

DIY Chalkboard Paint Kitchen Cabinets! Tons of great budget ideas to add character to a kitchen in this post!


**To see what's happened to the kitchen since this original post, check out these posts! There's been so much great stuff!
Click herehere, or here


Follow my blog with
bloglovin' photo BlogLovin_zps5407d9e3.jpg
Follow my blog onFacebook or

or

Subscribe to LiveLoveDIY with email!
Enter your email address:


click map Facebook Pinterest Google+ Twitter Mail Subscribe

-->

Quick and Easy LiveLoveDIY Projects

Mod Podge Hangers Photo Wall Ideas Sequin Art Chalkboard Cabinets Gold Leaf Art Stacked Log Tutorial