I recently updated our 1970's guest bathroom by painting the cabinetry, replacing the builder grade mirror, painting the walls, and adding a striped accent wall.
I started out with a bathroom that looked like this.
And after just a few days and less than $200, I ended up with a space that I love. It just feels so much better now.
Since the reveal, many of you have asked how to paint stripes.
So, today we'll breeze through a quick tutorial.
So, today we'll breeze through a quick tutorial.
You just need a few supplies.
Here's what I used:
2. Paintbrush (I use a Wooster Shortcut Paintbrush and swear by it. It saves so much time.)
4. Tape measure
5. Painter's Tape (This one is great for getting a crisp line.)
6. Level
*Above links are affiliate links.
Here are the paint colors I used in our guest bath.
I used the Ocean Pearl (flat finish) as my main color and the Sea Salt (flat finish) as my accent stripe color.
And a closeup:
To read how I made that bird art for free, go here.
Now let's get started.
The first thing you need to do is decide how big to make your stripes. I measured the height of my wall, and divided the height by the number of stripes I wanted. For my wall, this determined that I should make each stripe 11 inches wide. (Doing this insures that you don't end up with a half stripe up at the top or bottom of your wall.)
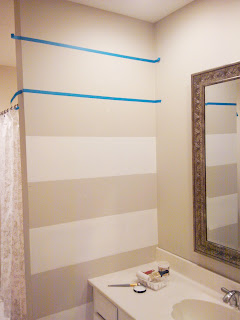
Once you know the width of each stripe, use your tape measure, level, and painter's tape, and start taping off the wall where the stripes should be.
Make sure to press firmly on the edges of the tape. Run your finger along the edge, or use something like a credit card. This will prevent your paint from bleeding underneath the tape. As long as you've pressed down the tape, you should get a nice clean line.
Then paint every other stripe with the accent color you've chosen.
Then paint every other stripe with the accent color you've chosen.
As you can see in the above photo, when I was done painting a stripe, I took the tape down. You'll want to take the tape down while the paint is still wet to avoid damaging the paint.
When it's done, you should have something like this:


.JPG)
.png)
.JPG)


.jpg)


Love it. Found you from your home office feature on remodelholic so now I get to read all your older posts! Yay! I'm painting my hall in white and off white stripes and your project results are motivation to get it done.
ReplyDeleteCan you do this on a wall with texture or will the paint bleed through the tape?
ReplyDeleteFor Mrs derrick: I make super clean lines by rubbing each edge of the painters tape so I know the tape adhered to all the groves in the textured wall. I also pull the tape off quickly after painting so the paint doesn’t have a chance to seep through and stick where you don’t want it.
ReplyDeleteThis looks great! I love the idea of getting full stripes, I would have haing halv a stripe on the top of bottom of the wall. I think your post is great :)
ReplyDeleteThanks for the awesome tutorial! I've posted a link to it on my blog: http://charleydeeandme.blogspot.com/2013/05/striped-walls.html
ReplyDeleteHow tall did your stripes end up being? I really love the look :)
ReplyDeleteWhere did you buy your shower curtain? very pretty:)
ReplyDeleteLove these stripes! We're in the process of taping up our hallway to do the same thing but haven't started painting yet. Did you do anything special to ensure there was no bleeding (I've read some people painting over the tape first with their base color before painting the stripes on... others using special tape, etc). Any tips would be great!
ReplyDeleteA super tutorial. I have painted stripes using a different paint strategy for tone on tone walls (a wallpaper look without the wall paper). I've tried two different approaches - each works well, but is a bit different. 1) same paint color, but in a different finish (flat + eggshell or semi-gloss). 2) paint the stripe in a glaze (just to put the shiny part on the wall, but doesn't change the color). Thought you might be interested in this approach. cheers, M (great choice of color - thanks for sharing)
ReplyDelete