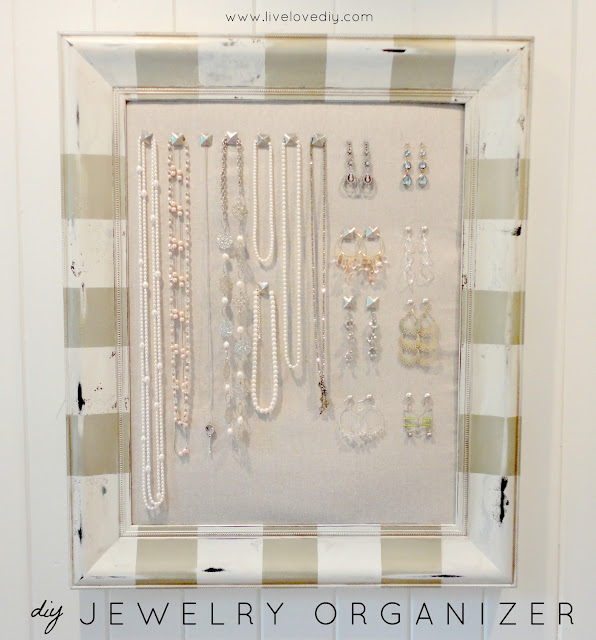
Today I'm showing you how I made my DIY jewelry organizer. For years, I've been accustomed to cramming my jewelry in a drawer somewhere. Since that doesn't work too well, I decided to come up with a better way to organize my jewelry. I decided to salvage an old frame and make a DIY corkboard jewelry organizer. The end result was great! I absolutely love the way it turned out!
I decided to hang my jewelry from decorative nailheads that I found for only $3 at a craft store.
.JPG)
I started out with my favorite frame ever. It was originally just a plain black frame, but I wanted it to be a little special! For a full tutorial on how to stripe a frame like this, you can visit my the striped mirror project here. I did it with spray paint!
Once you have your frame, gather the rest of your supplies. You'll need a cork roll, scissors and hot glue/staples. I chose to cover my board in burlap, but it would be cute without it, too. You also need thumb tacks or nailheads to hang the jewelry with. I thought giant nailheads would be a great special touch!
First, either cut a piece of cardboard or plywood to fit your frame. Plywood is ideal, but since I had some super-tough cardboard laying around, I used it. It worked just fine.
Roll the corkboard out and put your cardboard on top. Then, cut the plywood to the exact same size as the cardboard. Hot glue the two together firmly.
Now that your corkboard is done, wrap it in burlap and glue it tightly to the back. It won't matter what it looks like on the backside, as it will be hanging on the wall.
Next, insert your finished corkboard into your empty frame and attach hanging wire. I also hotglued my corkboard into the frame around the edges so that it didn't budge.

I used big nailheads to hold necklaces and then some smaller nailheads to hold earrings. I just thought it would look neat to add some variety.
Some of the earrings I was able to stick directly in the corkboard. You can arrange the nailheads however you want, and fit as much or as little jewelry on the board as you choose! Get creative!
It's so nice to finally have a place to store and display all of my favorite jewelry!


-->

.JPG)
.JPG)


You know what? I've never actually seen one of these that I liked until today! I usually think these turn out looking tacky, but yours is lovely. Well done!
ReplyDeleteWhy, thank you, Courtenay!!! I'm so glad you liked it!! :)
ReplyDeleteIt looks great, I love the neutral odors ou used. I'm not a huge jewelry person but I think I might just have nough to warrant making one of these!
ReplyDeleteWow, autocorrect on my iPad really messed that comment up- I meany neutral COLORS! No stinky organizers!
ReplyDeleteHa...love Melissa's comment.
ReplyDeleteAnyways...I think I need one of these!! Soon. Yesterday.
Lol, neutral odors...
ReplyDeleteThis looks terrific! Love the striped frame.
ReplyDeleteThis is such a great idea and I love the colors, too! Pinned!
ReplyDeleteSO classy - beautiful!!
ReplyDeleteI love those stripes!!! You've done a great job with that, it's beautiful!
ReplyDeleteThanks girls!!!!! Ya'll are just awesome! Love all the support and pins!! :)
ReplyDeleteOh, Virginia! That is fantastic! I've been needing some inspiration in this area for-EVER! I hate my jewelry just junking up the drawer and never being able to find anything... Yay!
ReplyDeleteI'm obsessed with jewelery and organization too! And that's why I made my own hanger for necklaces! It's not as cute and organized as yours (I still love the feeliing of having things messy-organized) but I love how it looks in my bedroom...
ReplyDeletehttp://summerinsavannah.blogspot.com.es/2012/02/necklaces.html
I love everything about this! I love the frame, I love the fabric, and color choices, I love your jewelry taste too! Go figure. ;)
ReplyDeleteSuper cute!! Love it! Well done!!
ReplyDeleteThanks so much Claire!!! xo
Delete
ReplyDeleteYour toy it's so beautiful, I like it vey much, I also bought one at Bridesmaid Dresses
, If you want one too. can visit this address, The backpacks are
beautiful at there. I think you will be love it too.
So creative & beautiful! I am doing this!!
ReplyDeleteUghhhhh your blog is like CRACK to me! It's so addictive, I think I'll never sleep! You've inspired me to do so many DIY thrift makeovers my head is spinning! I been pinning everything lol! Keep up the amazing creativity!
ReplyDeletewww.theluxelifesociety.com
What store did you get those nailheads, I am making this and can't find those nailheads. Love love love this!!!!
ReplyDeleteHi there! I think they were from Hobby Lobby!
Delete