Showing posts sorted by relevance for query Corner. Sort by date Show all posts
Showing posts sorted by relevance for query Corner. Sort by date Show all posts
May 9, 2013
Upholstery Tips and Tricks
I just reupholstered my thrift store chair again. (It's going in the room I've been working on, and it needed a fresh new 'do.)
I've done several upholstery tutorials on the blog, and there are several FAQ's I get with every tutorial.
They're the same questions I had when I first started playing around with upholstery, so today I thought I would share a few tricks I've learned along the way and answer one of your most frequently asked questions.
March 1, 2013
DIY Striped Upholstered Bench
Yesterday I shared a few changes I made to our master bedroom. One of those changes was the piano bench that I made into an upholstered stool. And the best part is that I made it for just $5!

I was originally inspired by the $400 Ballard Designs Simone Bench. It's totally awesome...and totally out of my price range.
So, I decided to make my own instead.
The entire project took less than an hour, and was super easy to do. Basically, I saved about $400 (the price of the real bench) by making it myself. Not too bad for an hour with a hammer and a glue gun.
I started with a basic piano bench that I originally found at a thrift store.
I purchased 2 yards of fabric (a remnant I was lucky enough to find for a few bucks), 1 box of nailheads, and then used what I had on hand: hotglue, glue gun, hammer, scissors, and pillow stuffing.
You can invest in foam padding if you want, but I have tons of extra accent pillow inserts and just used the stuffing from those as a cheap alternative to foam.
You can invest in foam padding if you want, but I have tons of extra accent pillow inserts and just used the stuffing from those as a cheap alternative to foam.
The first thing you'll want to do is arrange and secure your fabric to your bench. Line up your fabric how you want it and then secure the fabric to two of the bench legs. Use two nailheads, one on each of the two legs.
Once the fabric is secured, work on making the corners for both legs on this side. To make a neat corner, hotglue the fabric onto the leg and fold over the top part.
Once it's folded neatly, and you can clearly see how much fabric you need, cut the fabric. Leave enough to fold about an inch of it under.
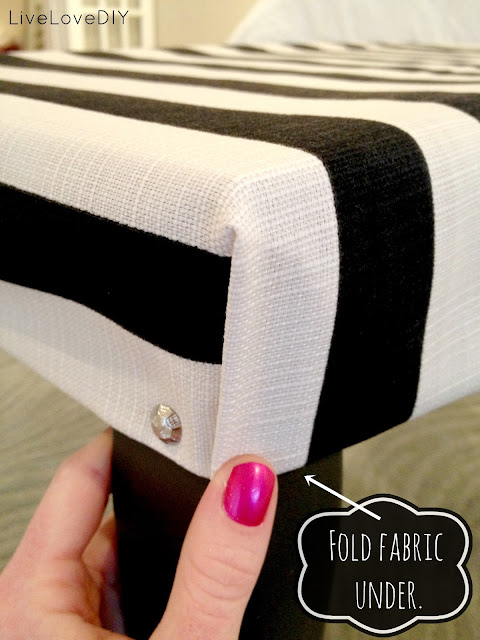
Next, fold it under and make it even with the part of the fabric that's already secured.
Next, secure the corner with two more nailheads, one directly on the corner, and one near the edge of the leg.
Next, add some nailheads to only ONE of the long sides, and both ends.

You'll fill in your nailhead trim later. For now, you'll just want to add enough to secure the fabric in place. That way, if you mess up, you won't have to pry up a million nails.
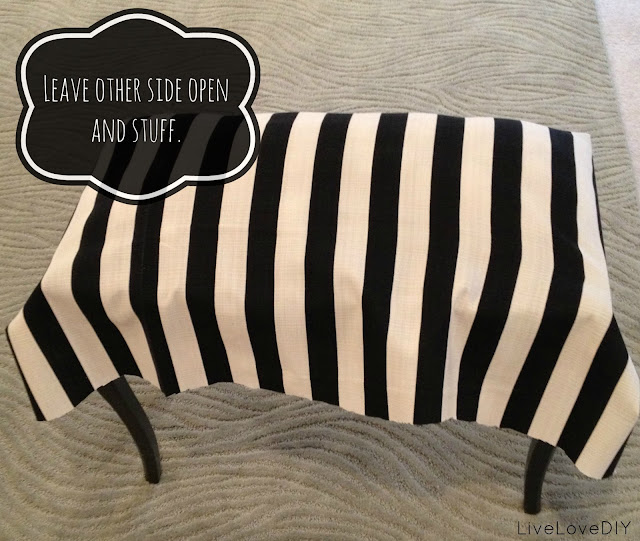
At this point, your bench should be secured on 3 sides, with one side still open.
TIME TO STUFF!
I used the stuffing from two pillows for my bench cushion. You can make it as fluffy/unfluffy as you want.

I like to use pillow stuffing for my upholstery. (It's all from new pillows though. Don't use old pillow stuffing. That's just gross, and a dust-mite nightmare.) It's really easy to push it into all of the corners and it makes the cushion really comfy. You have to work it a little bit to get it even, but I'm up for the challenge if it means saving $50 on foam.
Once your bench is fully stuffed, pull the fabric tight and start securing with nailheads. If you're using upholstery fabric, it should be heavy enough that when it's pulled tight, your stuffing looks pretty even. If it's lumpy, rework it or pull your fabric tighter. Complete the remaining two corners just like you did with the other ones. Now fill in the rest of your nailheads. You can use as many nailheads as you'd like. I chose to space them about 1.5'' apart. To make the fabric super secure and finished looking, I also hotglued the fabric around all the edges.
It's not perfect, and as with every DIY project, it requires a little trial and error. However, for $5 and an hour's time, I think it looks great in our bedroom!
Thanks so much for stopping by today! If you want to see where this little bench ended up eventually (in one of my favorite areas of the house!) go here.
March 16, 2017
Ava's Baby Room Reveal
Hey guys! I'm so excited to share Ava's baby room with you tonight. It's one of my favorite rooms I've created, ever. Ava was with me while I was photographing the room yesterday, and therefore she is in every picture. Fun fact, toddlers don't care what you are trying to accomplish.
You are subject to their terms.
Also, I had about 10 minutes to clean this room, which basically involved opening the blinds and pushing Ava's toys into the corner. This is my current version of 'styling'. It's authentic and real and oh so janky.
I hope you enjoy it.
May 1, 2014
Our 1970's House Makeover Part 6: The Hardwood Stairs and Entryway Makeover
We've made a lot of progress on the stairs and entryway in the past couple weeks, and although I really wanted it to be finished before I showed you, it just isn't.
I know you guys still want to know what's going on though, so consider today a progress report.
I'm contemplating changing the name of my blog to LiveLoveSnail.
November 13, 2014
10 Secrets for Buying The Best Furniture on Craigslist
Over the past four years, I've spent a lot of time buying and selling our stuff on Craigslist. It's a great way to find stylish decor on a budget, and if you're anything like me (a crazy person who rearranges things once a month), Craigslist becomes a great way to keep your budget intact by selling off the old stuff you no longer want.
So, today I thought I would share some of my Craigslist shopping tips with you guys.
Plus, it's just fun to look at Craigslist finds together.
Ulterior motive revealed.
February 27, 2012
How To Paint Furniture: Stenciling
Today I'm showing you one of my favorite furniture makeovers and showing you how I stencil furniture.

This was an old wooden vanity table and stool that I found on Craigslist for $10. I painted it with my homemade chalk paint, changed the hardware, reupholstered it, stenciled it, and added a spray-painted mirror hung above it. This was the finished result:

This was an old wooden vanity table and stool that I found on Craigslist for $10. I painted it with my homemade chalk paint, changed the hardware, reupholstered it, stenciled it, and added a spray-painted mirror hung above it. This was the finished result:
Basically, I did everything you could possibly do to turn an outdated thrify find into something snazzy. And all for under $20 total.
This was the first piece of furniture I ever stenciled. I would usually just paint or refinish a piece, but with this small vanity table, I decided to try something different.
I painted the entire table (using Behr Creamy White converted into chalk paint) and then stenciled a lattice design using gold metallic paint. I forgot to snap a before picture (this was done before my blogging days), so just imagine a knotty-pine-nightmare and you'll have a good idea of what this used to look like before a coat of white paint.
And then there's the awesome rose-upholstery.
I decided to replace that with some neutral material.
Here's some details in case you'd like to try this at home.
Supplies:
1. Upholstery fabric of your choice (I used about 1/3 of a yard.)
2. trim (optional)
3. Staple gun & staples
4. scissors
5. screw driver
6. hot glue gun & hot glue sticks
7. painter's tape
8. metallic paint for stencil (or color of your choice)
9. stencil
10. paintbrush or roller
(and of course the paint to paint the whole vanity & stool if yours is also a wooden monstrosity)
PART I: UPHOLSTERY
To reupholster the stool, you first have to remove the top cushion from the base of the stool. It's usually screwed on and a simple screwdriver will do the trick.
Next, separate the cushion from the base and place the cushion on your fabric. Make sure the side of the fabric you want to show is facing the floor. Like this:
Make sure there is enough fabric on each side to wrap over the edge. Staple around all four sides, leaving just the four corners unstapled.
Once your cushion looks like the above picture, you are ready to finish the corners. To make the corners look as smooth as possible, I cut the majority of the fabric off of the corner and leave just a little strip of fabric remaining. Then, I pull the strip as far as I can towards the middle and staple it securely to the wooden bottom. It should look something like this once the corners are finished:
Now, you are ready to reattach the cushion to the base! I just poked around for the original holes and then matched them up with the holes on the base. Then simply screw the original screws back in.
Voila! Your stool is now upholstered with pretty new fabric!
Now, to make your stool look nice, I think it is best to use some trim to cover the gap between the base and cushion. I purchased 2 yards of trim from Hobby Lobby for $4 total. You simply start at one corner and hot glue it around the edges.
and then you will have something that looks like this.
PART II: STENCIL THE TABLE
I found this 'Iron Lattice' wall stencil at Hobby Lobby.
Take the stencil and tape it where you want it on the first half of the table (with your blue painter's tape).
Next, dip your roller in your paint choice
and paint over the the part covered by the stencil. Go light on the paint so that it doesn't seep under the stencil. I rolled my roller over a paper towel a few times before I started.
and paint over the the part covered by the stencil. Go light on the paint so that it doesn't seep under the stencil. I rolled my roller over a paper towel a few times before I started.
While the paint is still wet, remove the tape and the stencil. It should look like this:
Next, match up the stencil and repeat on the opposite side. Again, remove the stencil and you will have this:
And you're done!
If you want to add a mirror, you can be cheap like me and find a thrift store mirror with a decent frame and spray paint it. This one was originally dark wood and I simply painted it gold.
I think it looks so great in the bedroom. Almost everything in this bedroom came from a thrift store and has been repurposed.
Don't forget to pin this post so you can find it when you need it!


-->
Subscribe to:
Posts (Atom)
.jpg)

.jpg)


.jpg)


.JPG)
.JPG)
.JPG)
.JPG)
.JPG)
.JPG)
.JPG)
.JPG)
.JPG)
.JPG)
.JPG)
.JPG)
.JPG)
.JPG)
.JPG)
.JPG)
.JPG)

.JPG)
.JPG)
.JPG)


