
Showing posts with label Master Bedroom. Show all posts
Showing posts with label Master Bedroom. Show all posts
April 12, 2016
Master bedroom decorating updates!
Hey ya'll.
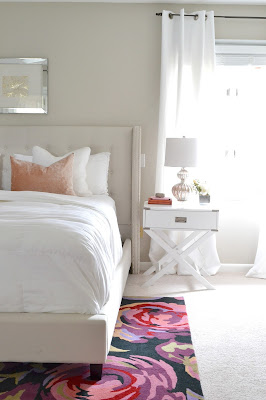
So, I changed our master bedroom a little bit, and I thought I would pop in really quick to share a few pics of the updates with you guys.
February 26, 2015
Master Bedroom Updates and The Hot Pink Couch
Hey ya'll! First things first, thank you so much to every single person who took the time to email me, comment, or send their congratulations via social media after my last post. It really meant so much to me, and it totally took me by surprise to see how excited everyone was. I've felt a little down during this pregnancy due to being so sick, and it was just the boost I needed. Thank you guys.
February 21, 2014
DIY Decorating Ideas for Your Bedroom
Hey ya'll! So, today I'm finally sharing all of the little changes I've been making to the master bedroom over the past month or so.
First things first, let's address the elephant in the room:
This room is on its 11th look.
And I realize it's ridiculous.
However, decorating is so hard for me, and it might take me 14 times to get it right. Plus, I think I've spent about $3 in 3 years on this room, give or take.
Can we just hug the elephant and call it a day?
March 1, 2013
DIY Striped Upholstered Bench
Yesterday I shared a few changes I made to our master bedroom. One of those changes was the piano bench that I made into an upholstered stool. And the best part is that I made it for just $5!

I was originally inspired by the $400 Ballard Designs Simone Bench. It's totally awesome...and totally out of my price range.
So, I decided to make my own instead.
The entire project took less than an hour, and was super easy to do. Basically, I saved about $400 (the price of the real bench) by making it myself. Not too bad for an hour with a hammer and a glue gun.
I started with a basic piano bench that I originally found at a thrift store.
I purchased 2 yards of fabric (a remnant I was lucky enough to find for a few bucks), 1 box of nailheads, and then used what I had on hand: hotglue, glue gun, hammer, scissors, and pillow stuffing.
You can invest in foam padding if you want, but I have tons of extra accent pillow inserts and just used the stuffing from those as a cheap alternative to foam.
You can invest in foam padding if you want, but I have tons of extra accent pillow inserts and just used the stuffing from those as a cheap alternative to foam.
The first thing you'll want to do is arrange and secure your fabric to your bench. Line up your fabric how you want it and then secure the fabric to two of the bench legs. Use two nailheads, one on each of the two legs.
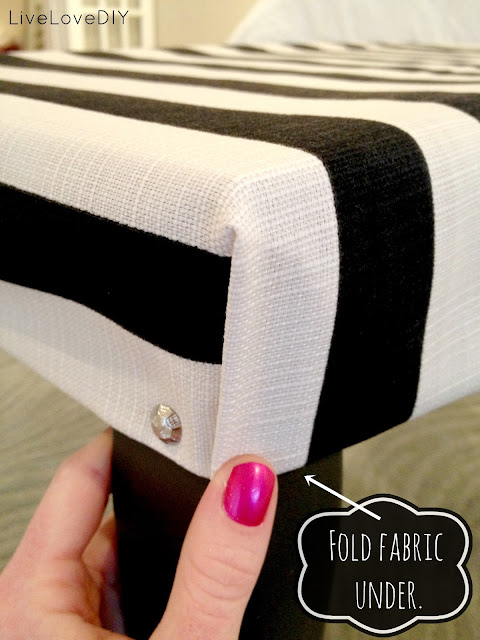
Once the fabric is secured, work on making the corners for both legs on this side. To make a neat corner, hotglue the fabric onto the leg and fold over the top part.
Once it's folded neatly, and you can clearly see how much fabric you need, cut the fabric. Leave enough to fold about an inch of it under.
Next, fold it under and make it even with the part of the fabric that's already secured.
Next, secure the corner with two more nailheads, one directly on the corner, and one near the edge of the leg.
Next, add some nailheads to only ONE of the long sides, and both ends.

You'll fill in your nailhead trim later. For now, you'll just want to add enough to secure the fabric in place. That way, if you mess up, you won't have to pry up a million nails.
At this point, your bench should be secured on 3 sides, with one side still open.
TIME TO STUFF!
I used the stuffing from two pillows for my bench cushion. You can make it as fluffy/unfluffy as you want.
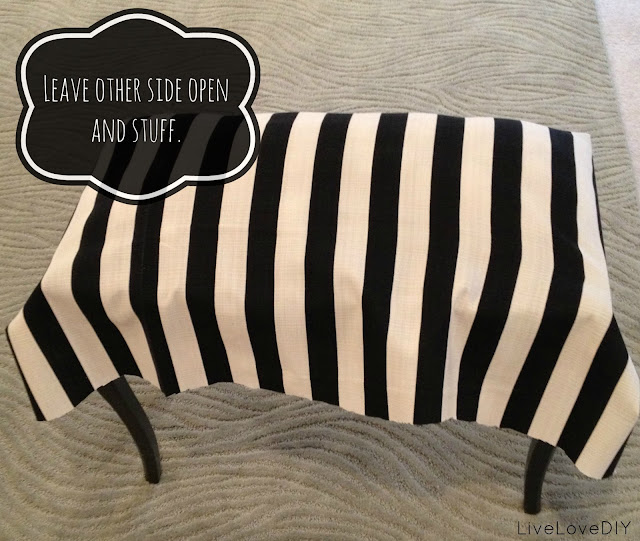
I like to use pillow stuffing for my upholstery. (It's all from new pillows though. Don't use old pillow stuffing. That's just gross, and a dust-mite nightmare.) It's really easy to push it into all of the corners and it makes the cushion really comfy. You have to work it a little bit to get it even, but I'm up for the challenge if it means saving $50 on foam.
Once your bench is fully stuffed, pull the fabric tight and start securing with nailheads. If you're using upholstery fabric, it should be heavy enough that when it's pulled tight, your stuffing looks pretty even. If it's lumpy, rework it or pull your fabric tighter. Complete the remaining two corners just like you did with the other ones. Now fill in the rest of your nailheads. You can use as many nailheads as you'd like. I chose to space them about 1.5'' apart. To make the fabric super secure and finished looking, I also hotglued the fabric around all the edges.
It's not perfect, and as with every DIY project, it requires a little trial and error. However, for $5 and an hour's time, I think it looks great in our bedroom!
Thanks so much for stopping by today! If you want to see where this little bench ended up eventually (in one of my favorite areas of the house!) go here.
February 28, 2013
Master Bedroom Updates!
Hope everyone is having a great week so far! I've been busy all week making a few changes to our master bedroom. For those who follow my blog, you know that I've assembled this room almost entirely from thrift store finds or handmade items. Sometimes I get it right, and sometimes I get it wrong, but our bedroom continues to evolve and improve as time goes on. Today I have a few updates for you!
You may have noticed that little striped bench peaking through in the above pics. For nearly a year now, I've been eyeballing this Ballard Designs Simone Bench. It comes in many different colors, but I've had my eye set on one pattern, and one pattern alone.
However, at the price of $401, it did not fit into my $10 budget.
So, I decided long ago to make my own. One day last week I saw this bench I had sitting in my bedroom.
Hello, sir.
This was an old $5 piano bench I brought home from Goodwill. I originally painted it dark brown and put it near my hutch desk in the bedroom (last seen here). And so this week, I turned it into my very own version of the Ballard striped bench.
It cost me less than $5 to upholster it using some remnant fabric from Joann's. I finished it off with some silver nailheads and painted the legs white.
And since I'm no stranger to upholstering things
(like my DIY dropcloth headboard) it took me less than an hour to completely upholster my little striped bench.
I've been looking for something to take this room up a notch, and I think this may have helped. I still need some color, but I'm still working on that!
This room will forever be a work in progress, since I'm totally learning as I go along.
One more update. Remember the thrift store desk turned vanity, paired with my thrift store chair (that I reupholstered with blue stripes)?
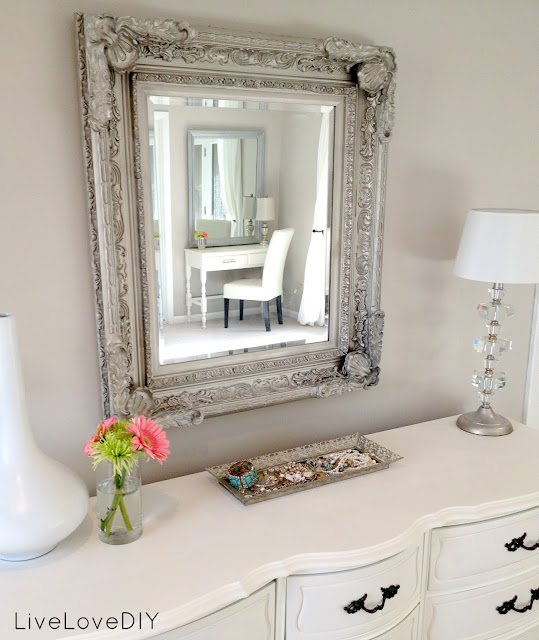
Well, I decided to change it. I painted the mirror silver, painted the vanity with my favorite paint, and got a new ivory leather chair from Marshalls.
I think the whole things works better with this room now.
I added some fresh flowers around the room. While not a permanent addition, it always makes me happy to have some flowers around.
So that's all of the updates to the bedroom for now!
Make sure and stop by tomorrow, when I'll be sharing step-by-step how I made my Ballard Designs knock-off bench from an old piano bench!
Also, before you go, just to remind you....the bedroom looked like this 3 years ago. :)
Make sure and stop by tomorrow, when I'll be sharing step-by-step how I made my Ballard Designs knock-off bench from an old piano bench!
Also, before you go, just to remind you....the bedroom looked like this 3 years ago. :)
see the full story about THAT here.
January 10, 2013
How To Update Old Brass Fixtures
Have you ever found something really cool at a thrift store and you bring it home and that one little thing ignites a spark that makes you change a bazillion other little things in your house?
Well, that happens to me on a weekly basis. For my own mental sanity, I should really just stay out of thrift stores, but dangit they draw me in like a gnat to a porch light.
This past weekend, I came across a brassy little lantern chandelier at the thrift store. I had been looking for something like this for awhile, so when I saw a $5 price tag on the lantern, I think I yelped outloud. Seriously, this thing should have been more than $5.
High-five to the awesome person who donated this to the thrift store.
High-five to the awesome person who donated this to the thrift store.
When I saw this thing, I knew immediately where it would go.
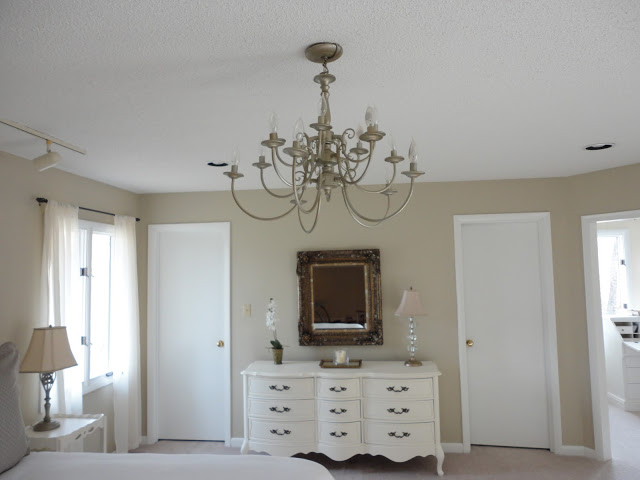
The above picture is from the first set of renovations I did to our master bedroom. I found that giant chandelier (also originally brass) and decided that it was better than the dark brown ceiling fan that was there before.
You have to go see the before pic of this room with the dark wood paneling and old ceiling fan.
After a while of living with the giant chandelier, it began to really annoy me. It was just too large.
You have to go see the before pic of this room with the dark wood paneling and old ceiling fan.
After a while of living with the giant chandelier, it began to really annoy me. It was just too large.
The little brass lantern seemed like a much better fit.
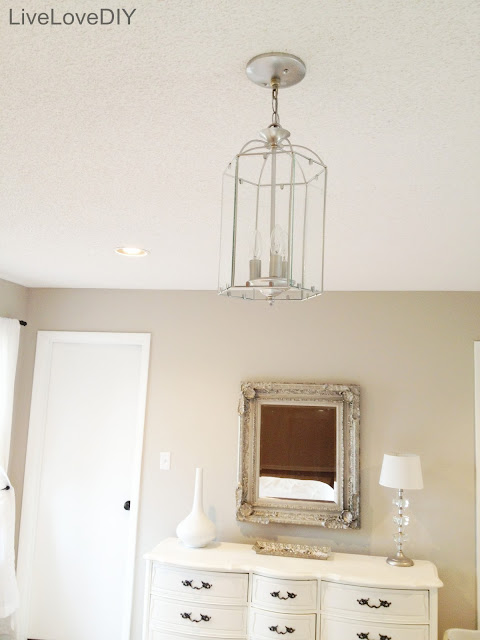
So, I decided to spray paint the little brass lantern, too.
Here's what I ended up with.
Here's what I ended up with.
I really love the way it turned out, and the size fits the room much better.
To update the chandelier from brass to brushed silver, I used one of my favorite silver spray paints, Rustoleum Titanium Silver (amazon affiliate link). This is the same paint that I used all over my kitchen and on my bathroom faucet. I like it because it creates a brushed nickel finish rather than a chrome silver finish. So, it's perfect for all sorts of home decor stuff, especially fixtures.

Once I had my chandelier hung, it got me on a redo-tons-of-other-stuff-binge. So, I completely redid my vanity area. If you read my blog a lot, you might notice what I did.
I spray painted the vanity mirror silver, too. And I also painted the table satin black, and completely reupholstered the chair.
See how this thing looked the day I brought it home from the thrift store here.
I love the way it looks in the evenings, with the little lamp on. Here's what it looks like during the day now.
I like the new vanity colors much better. They complement the green rug and embroidered pillows now.
And that's not all. While I had my spray paint out, I spray painted another thrift store find. I found a little gold mirrored vanity tray at the thrift store for $2. I thought it would be perfect to hold some of my jewelry.
Most of this junk is from Target and thrift stores. And Forever 21...or Forever 29, as I like to call it.
And one last thing, I decided to sell my old vanity stool that sat under my antique flip-down desk. It was too small. So, I pulled an old piano bench out of a storage closet and painted it black. It's not a permanent solution, as I really have no idea what to do with this room long-term. But, it's okay for now.
Check out how I later upholstered this stool with stripes here.
And those are all of the bedroom updates for today!
Thanks so much for stopping by!
*To see a complete history of the evolution of this room from the day we moved in to months after this post was written, go here.

And those are all of the bedroom updates for today!
Thanks so much for stopping by!
*To see a complete history of the evolution of this room from the day we moved in to months after this post was written, go here.


-->
Subscribe to:
Posts (Atom)


.jpg)




.jpg)


.jpg)
.jpg)

.jpg)
.jpg)


.JPG)



.JPG)
.JPG)

.JPG)


.JPG)


