Yesterday I shared a few changes I made to our master bedroom. One of those changes was the piano bench that I made into an upholstered stool. And the best part is that I made it for just $5!

I was originally inspired by the $400 Ballard Designs Simone Bench. It's totally awesome...and totally out of my price range.
So, I decided to make my own instead.
The entire project took less than an hour, and was super easy to do. Basically, I saved about $400 (the price of the real bench) by making it myself. Not too bad for an hour with a hammer and a glue gun.
I started with a basic piano bench that I originally found at a thrift store.
I purchased 2 yards of fabric (a remnant I was lucky enough to find for a few bucks), 1 box of nailheads, and then used what I had on hand: hotglue, glue gun, hammer, scissors, and pillow stuffing.
You can invest in foam padding if you want, but I have tons of extra accent pillow inserts and just used the stuffing from those as a cheap alternative to foam.
You can invest in foam padding if you want, but I have tons of extra accent pillow inserts and just used the stuffing from those as a cheap alternative to foam.
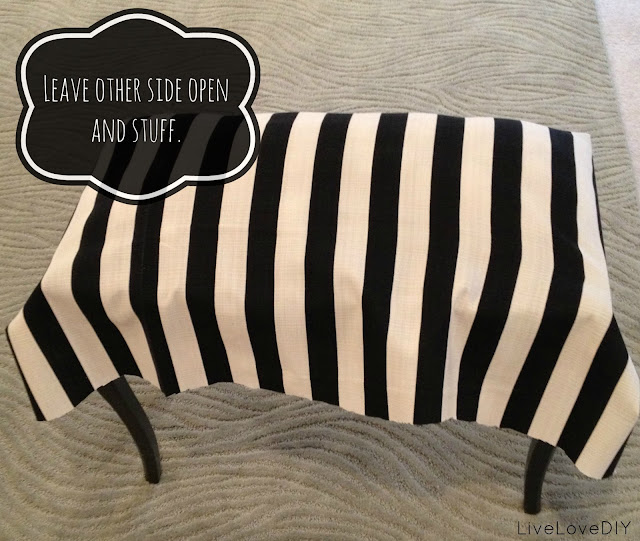
The first thing you'll want to do is arrange and secure your fabric to your bench. Line up your fabric how you want it and then secure the fabric to two of the bench legs. Use two nailheads, one on each of the two legs.
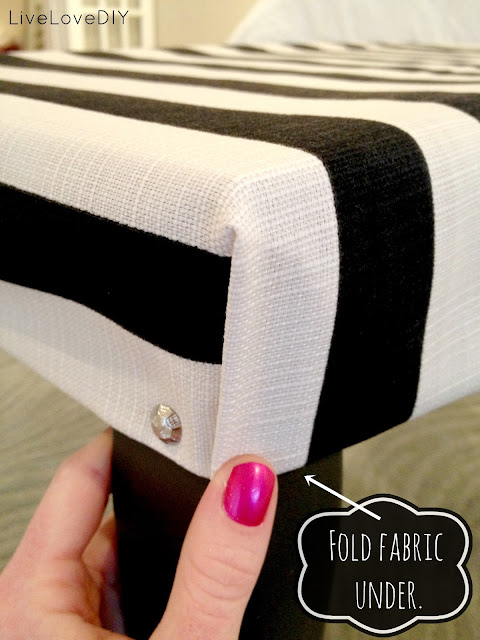
Once the fabric is secured, work on making the corners for both legs on this side. To make a neat corner, hotglue the fabric onto the leg and fold over the top part.
Once it's folded neatly, and you can clearly see how much fabric you need, cut the fabric. Leave enough to fold about an inch of it under.
Next, fold it under and make it even with the part of the fabric that's already secured.
Next, secure the corner with two more nailheads, one directly on the corner, and one near the edge of the leg.
Next, add some nailheads to only ONE of the long sides, and both ends.

You'll fill in your nailhead trim later. For now, you'll just want to add enough to secure the fabric in place. That way, if you mess up, you won't have to pry up a million nails.
At this point, your bench should be secured on 3 sides, with one side still open.
TIME TO STUFF!
I used the stuffing from two pillows for my bench cushion. You can make it as fluffy/unfluffy as you want.

I like to use pillow stuffing for my upholstery. (It's all from new pillows though. Don't use old pillow stuffing. That's just gross, and a dust-mite nightmare.) It's really easy to push it into all of the corners and it makes the cushion really comfy. You have to work it a little bit to get it even, but I'm up for the challenge if it means saving $50 on foam.
Once your bench is fully stuffed, pull the fabric tight and start securing with nailheads. If you're using upholstery fabric, it should be heavy enough that when it's pulled tight, your stuffing looks pretty even. If it's lumpy, rework it or pull your fabric tighter. Complete the remaining two corners just like you did with the other ones. Now fill in the rest of your nailheads. You can use as many nailheads as you'd like. I chose to space them about 1.5'' apart. To make the fabric super secure and finished looking, I also hotglued the fabric around all the edges.
It's not perfect, and as with every DIY project, it requires a little trial and error. However, for $5 and an hour's time, I think it looks great in our bedroom!
Thanks so much for stopping by today! If you want to see where this little bench ended up eventually (in one of my favorite areas of the house!) go here.


.jpg)


.jpg)


Oh my gorgeous!!!! I love that you showed how to tuck that corner! You are soooo smart and talented...really fabulous job!
ReplyDeleteThanks Jessica!!!! You are the sweetest!!! :)
Deletethis is so cool great post ;)
ReplyDeleteOk, so this is amazing! Super cute :) I found you at TT&J and am now following your awesome blog. Have a great weekend!
ReplyDeleteShandy @ Aprons 'n Pearls
I'm a HUGE fan of knock-offs!!! FABULOUS job! Great idea to use a piano bench. I used skinny coffee table for mine but now I'll start watching for old piano benches as well. Thanks for sharing! Have a wonderful weekend! ~ Judy
ReplyDeleteYou super thrifty gal! It's adorable!
ReplyDeleteThanks so much everyone!!!! I'm so glad my little bench is loved! :)
ReplyDeleteI love love love the striped bench!
ReplyDeleteJenny
http://simcoestreet.blogspot.ca
It's the weekend of knock-offs at the Serenity Now Link-up!! I'posted my Pottery Barn Knock-off of the Beaded Egg. Come check it out if you have a chance!! Your piano bench transformation is perfect!!!
ReplyDeleteAmazing transformation! I love it, you did such a great job! And it looks so easy that even I could do it. Thanks for the tutorial.
ReplyDeleteSaw you featured at Knock Off Decor
Debbie :)
Beautiful work! And I love your bedroom - it's lovely and I want that mirror!
ReplyDeleteFantastic job on the bench! Nothing like a cheap and trendy project. :)
ReplyDeletetoddlindsey.com
Gorgeous! I love the fabric you chose and the style matches perfectly to your pretty bedroom decor. Love it!
ReplyDeleteLooks great, I bet a bit of styrofoam from a large package wedged in between the stuffing would have given it the fuller upholstery foam look that you were trying to get. Still looks great.
ReplyDeleteI love this! Great job
ReplyDeleteI love it! The nail heads look great and I love the black and white!
ReplyDeleteHey Virginia, wow you are inspiring. I can only dream of how beautiful your entire new home is. I will stay tuned to see. I was wondering where you find it best to purchase all your materials, most of all the stuffing/ cushion. Just nabbed the cutest little end table ( which I'll try the bench with ). Also working on two rocking chairs. Should be fun!
ReplyDeleteI LOVE THIS!!!!!
ReplyDeleteThank you, I will be making one. You are awesome.
I've done a lot of DIY upholstery and the trick to making it smooth is to just put a piece of batting between the stuffing and the upholstery fabric. It works every time!
ReplyDeleteI love this idea! Thanks for sharing! :)
ReplyDeleteHi Virginia! I love this to bits! I'm going to use your method to make a high-back dining bench. Except with foam. Could you recommend where to get nailheads from? I'm in Toronto. Not sure if I should go to Home Depot, Fabricland or an arts and crafts store like Micheal's. Thanks!
ReplyDeleteBeautiful! And yours is much prettier then the one you copied.
ReplyDeleteGreat job, love the tutorial and of course the black and white stripe!
ReplyDeleteYours is way cuter than the original! It was kind of ugly in my opinion but your DIY with the white legs is divine!
ReplyDeleteI love this! I've been looking for a bench for my front entry and everything is bigger than what I want but this is perfect! I'm now on the search for a small bench I can fix up. ;) I'm loving your blog, so many great ideas, your house looks lovely!
ReplyDeleteLove the bench, love the blog, love your sense of humor and your helpful tips, but most especially love those pink, white and green pillows! Would you mind sharing where you got the fabric (if you made them) or where you purchased them? It's always a treat to visit your site -- your house looks gorgeous! Thanks!
ReplyDeleteI absolutely love this bench and really hope to try a project like this soon.
ReplyDeleteVirginia, as you know I'm a follower of your blog and I love everything you have done because your skills and talents have inspired me to try to refinish some furniture, if my life responsibilities slow down; hopefully in 2015. Have you ever considered adding more upholtery tacks to your black and white bench at foot of bed? Is this bench at the end of the bed more for decoration or do you use it regularly? My DH needs something like this or even a coffee table or cedar chest at foot of his bed to be able to sit on to put on clothes and shoes./socks. He is a fall risk, so I have to keep him safe and I cringe every time I see him struggling sitting on edge of bed getting himself dressed. I tell him to walk over to sit in the chair in the bedroom, but "you can't teach an old dog new tricks" so I just keep preaching(he's yell at me for nagging him so much)but I just need to keep him safe from a broken hip. I wonder if you used that bench every day if that stuffing wouldn't flatten, maybe a firm foam would be better. Just my two cents talking. I love everything you have done in your home. You are an inspiration to all of us.
ReplyDeleteHello!! I loveee that fabric! I have been looking for something similar would love to know where is the fabric from?
ReplyDeleteThis looks fabulous! I've always wanted to try but was worried it would be too tricky- you make it look so do-able :)
ReplyDelete