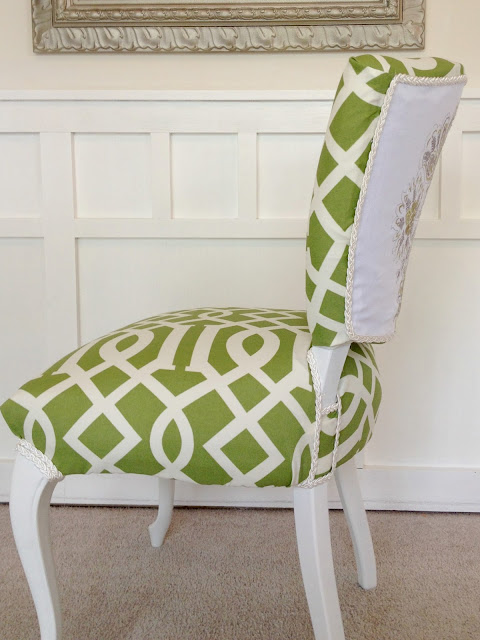
I just reupholstered my thrift store chair again. (It's going in the room I've been working on, and it needed a fresh new 'do.)
I've done several upholstery tutorials on the blog, and there are several FAQ's I get with every tutorial.
They're the same questions I had when I first started playing around with upholstery, so today I thought I would share a few tricks I've learned along the way and answer one of your most frequently asked questions.
First, let's check out the latest chair makeover.
Remember this guy? The chair with the hot bod stuck in the old-man-recliner-fabric?
This will officially be the third time I've reupholstered this chair (see here and here) and hopefully the last.
I chose a green and white Waverly fabric from Joann's, and I cannot wait to show you how amazing it looks in the room it's going in.
I think it's quite the improvement!
And when my math skills failed me and I ran out of material for the back panel, I decided to chop up an embroidered pillow cover and use it for the back. It sits against a wall, so it will probably never be seen anyways, but I kinda love the way it turned out.
So, let's talk upholstery tips. One of the most frequently asked questions I get is 'How do I make corners?'.
It took me a little trial and error to really figure out how to make a great corner. Since a botched corner can totally make or break your DIY upholstery job, it's a handy skill to have.
Here's how I do my corners. I have no idea if this is the right way, but it works and it's easy.
The first thing I do once I have my fabric cut to size and positioned on the chair correctly is to staple the fabric around the top of the leg and trim the fabric underneath the staple afterwards.
Next, I cut off the corner, leaving about 1-2 inches.
Then, push the fabric inward and create a pocket.
Once the fabric is tucked all the way inside and you have what looks like a seam, hotglue it closed.
(Obviously, if you sew, you would sew this cover. But as we all know, I love glue.)
Then, hotglue your trim or piping around the leg. This covers up the staples and any other little imperfections. I used two strips of trim. 'Cause I'm crazy like that.
And there ya have it....
a neat little corner on your freshly upholstered chair!
So tell me...What other upholstery questions do you have?
Feel free to leave them in the comment section below and I'll try to include them in my next upholstery post.
Don't forget to pin this lil' feller so you can find it later! :)
That's all for today! 'Til next time!


-->

.jpg)

.jpg)
.jpg)

.JPG)

.JPG)
.jpg)
.JPG)
.jpg)
.jpg)
.jpg)
.jpg)
.jpg)


Brillz. I always wondered how you do that junk!
ReplyDeleteI love that you just said Brillz. :)
DeleteAhhh awesome tips and I have this fabric in yellow on my sofa cushions!!!! I knew we were soul mates!
ReplyDeleteNo way!!! Do you really? FAVE! And duh...of course we are! <3
DeleteYou are a clever lady! Thanks for sharing.
ReplyDeleteVanessa
You're so very welcome Vanessa! Thank you!
DeleteLooks great! I will be upholstering 6 louis dining chairs soon, so definitely pinning this post! Thanks for sharing :)
ReplyDeleteOh my gosh!!! 6?! Girl, you are a brave soul! I bet they will turn out amazing! I LOVE Louis chairs! Can't wait to see! :)
Deletedid you remove the original fabric?
ReplyDeleteUm, gorgeous. And I love that you hot glued it shut. ps I made a purse out of that fabric in yellow.
ReplyDeleteAngela
Angela Says
I haven't been getting any posts from you for a long time. I tried to resubscribe but it said I was already subscribed. Could you check into why I'm not getting the posts?
ReplyDeleteThanks, Kate. Mkc@aol.com
I'm cracking up at your chair description. Hot bod with old man fabric!
ReplyDeleteLove the chair, but since my nails are usually "done" with stain and glue, I'm just in awe of your great manicure - love your nail polish!
ReplyDeleteAmazing!!!!!
ReplyDeleteThis is incredible! Did you remove the old material or just cover it up? It has a pintucked back. Did you stuff it to fill it out or does the new material on top just even it out?
ReplyDeleteHey! I discovered your blog a few days ago, and it's as if I'm on a netflix binge. I've literally been glued to my chair scrolling through ALL of your posts. Your house is beautiful and you eye for design is incredible! anyways, I was wondering if you would consider doing a post on the basics of reupholstering. Do you remove the original fabric? I wouldn't even know how or where to start. clearly I'm a noob at diy xD Thanks! :D
ReplyDeleteShe removed the original fabric and used the original fabric as a template. This was actually her second time reupholstering this chair. Here is the full tutorial on the first time she reupholstered this exact same chair: http://www.livelovediy.com/2012/07/thrift-store-chair-makeover.html.
DeleteFun!! I just took on my first reupholster with some vintage chairs and LOVE how they turned out. It's so fun! Cute blog, we do a lot of the same stuff!!!
ReplyDeleteOMG girl you are awesome. I self taught and STILL SELF TEACHING. I should name all my projects OOPS. Thank you for teaching me how to do corners. All the other sites are so stinkin complicated. Hot glue is my BESTFRIEND, now I have the confidence to redo my chair for the 5th time. One question they all say use fabric spray, but I hate working with that stuff makes all your body parts exposed sticky. UGH give me some advice. Thanks again your brilliant
ReplyDelete